
- Neo Biotech
- Nov 27, 2024
- 3 min read

Updated: Jan 7
Case Summary 🔎
Patient Information
Patient: 51-year-old male
Chief Complaint(C.C): The patient reported discomfort around the left maxillary area.
Treatment Plan
Branemark-type implants in the left maxillary posterior area presented with advanced peri-implantitis and severe bone loss.
A treatment plan was formulated to address the condition using the R-Brush for decontamination and regeneration.
Results
A #26 implant placed several years ago showed bone loss involving approximately 7 threads after 8 years. Treatment using the R-Brush successfully addressed the condition, demonstrating effective management and improved outcomes.
Pre & Post & Follow-up


Products Used
A regular size of R-Brush (Neobiotech, Korea) was used to mechanically decontaminate the contaminated rough surface.

Case Presentation
1️⃣ Pre-Op
fig 1. Three Branemark-type external implants were placed in the left maxillary posterior area with a sinus graft.
fig 2. 8 years later, advanced chronic peri-implantitis with severe bone loss was identified around the middle implant.


fig 3. The 3-unit SCRP (Screw & Cement Retained Prosthesis) was removed through the screw hole. Gingival swelling and redness are observed around the implant, indicating peri-implantitis.
fig 4. A severe defect was noted: an 8mm vertical defect with no buccal or lingual walls and exposure of 7 implant threads.


❔Key Question:
How can the contaminated rough surface be cleaned and decontaminated mechanically and chemically, and could this enable reosseointegration?
2️⃣ 1st Surgery - Peri-Implantitis Management
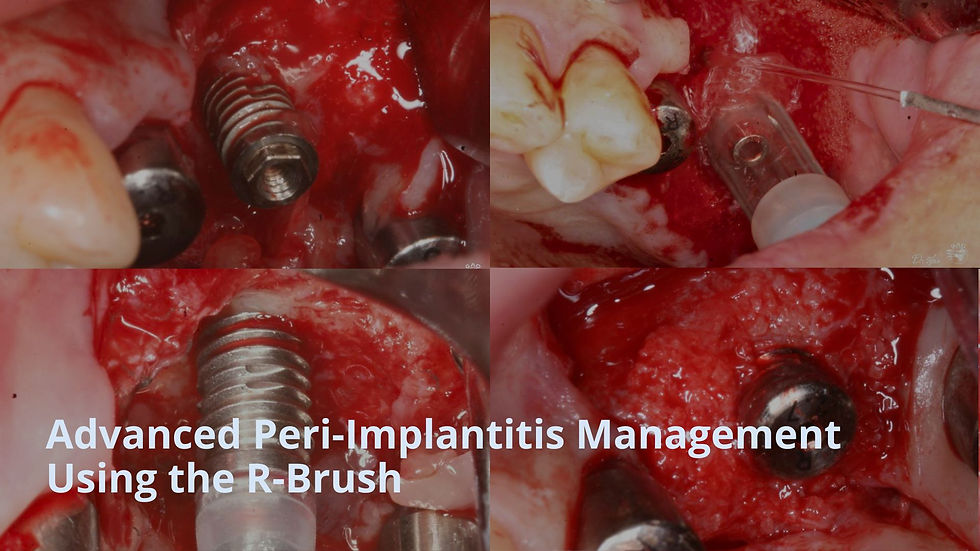
fig 1. Before using the R-Brush, the original screw from the prosthesis was inserted to a protection cap.
fig 2. The protection cap was connected to the screw hole to prevent bristle penetration into the screw hole. The tip of the R-brush can enter the implant interior, so the included plastic cap must be attached to prevent damage to the internal hex.


fig 3. A regular size of R-Brush was connected to a 1:1 contra-angle handpiece and rotated at approximately 8000 RPM with copious irrigation using water or chlorhexidine solution. Each thread required 30–60 seconds to clean. It took about 5 minutes to clean 7 threads.
fig 4. The rough surface transformed into a machined surface. The R-Brush effectively eliminated the original contaminated surface and created a new surface.


fig 5. An allogenic graft (RegenOss) was used to fill the large defect, with the implant itself serving as a space maintainer.
fig 6. A collagen membrane was placed to cover the graft material.
fig 7. It was submerged and sutured using Supramid suture material to prevent micro movement.


fig 8. A radiograph taken immediately after surgery

3️⃣ 2nd Surgery
fig 1. 4 months after 1st surgery, the site was covered with healthy gingiva without showing no signs of inflammation.
fig 2. A remarkable clinical outcome was achieved, with full regeneration of hard bone around the previously affected peri-implantitis site. New alveolar bone formation and successful osseointegration were confirmed.
fig 3. A radiographic taken 4 month after the 1st surgery.


4️⃣ Final Restoration
Buccal view: After the delivery of the definitive restoration, the gingiva appeared healthy.
Radiographic View: Periapical radiograph confirmed bone regeneration around the peri-implantitis affected area 4 months post-surgery.


5️⃣ Follow-up
At the 5-year follow-up, a healthy gingival condition was confirmed, and at the 9-year follow-up, the bone around the implant was found to be well-preserved.
5-year & 9-year follow-up


Before & 9-year follow-up


